Beadweaving Looms: Everything You Need to Know

What is beadweaving? On-Loom or Off Loom?
Beadweaving is the art of connecting and interlocking beads together to create intricate patterns and designs. Unlike stringing beads where beads are simply threaded onto string or wire, on-loom beadweaving requires specialized looms that allow beads to be woven together much like fabric. The technique likely originated thousands of years ago, with some of the earliest examples found in ancient Egyptian tombs.
There are several different beadweaving techniques, each creating different effects. Some of the most common techniques include peyote stitch, square stitch, and right angle weave. Peyote stitch involves stitching the beads together in straight rows, while square stitch connects the beads on the diagonal. Right angle weave uses fewer beads and allows more open lacy patterns. The type of bead loom and pattern will determine which technique is used.
No matter the technique, beadweaving allows limitless creativity! I just love how beads can be transformed into stunning woven bracelets, necklaces, and other jewelry pieces when stitched together using a bead loom. It’s an amazing way to combine craftsmanship, math skills, and beautiful designs. The beadweaving community is so supportive too, with many willing to teach their tricks of the trade. I hope you’ll give this satisfying artform a try!
What is a Bead loom?
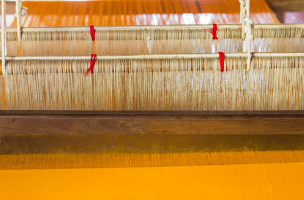
A bead loom is a tool used for weaving and stitching beads together. It provides the foundation for creating intricate beaded patterns, jewelry, accessories and more. At its simplest, a bead loom consists of a frame, threads or nylon cord, and some type of backing material like pegboards or plastic canvas. The warps or threads extend the length of the loom and beads are stitched over and under them to create the woven beadwork. Looms can be any size, from miniature travel size to wide wrap-around frames. They can also have various numbers of warp threads depending on the beadweaving technique.
I find working with a bead loom almost meditative. The repetitive motion of stitching each bead into place is so soothing! Yet it also challenges me creatively to translate beadweaving diagrams and patterns onto the pegboards. Bead looms really open up many possibilities beyond basic stringing. Whether it’s a simple peyote stitch bracelet or an elaborate tapestry, a bead loom provides the foundation for bringing any beaded design to life. I hope you’ll give bead looming a try and experience its magic!
Fabric Looms


Types of Bead Looms

Frame looms
A frame loom is a type of bead loom that consists of a rigid frame with threads strung across it. The threads, usually nylon cord or beading wire, provide the foundation for weaving beads together into jewelry, tapestries, accessories and more.
Frame looms can be used for many different beadweaving techniques including peyote stitch, loom weaving, and right angle weave.
Frame looms come in a variety of shapes and sizes. Mini frame looms are great for on-the-go projects, while larger stand-alone floor looms allow for bigger beadwork like purses or wall hangings. The frame may be made of wood, plastic, or metal and can be adjustable to accommodate varying numbers of warp threads.
I love the versatility of frame looms – I can use the same loom for both delicate seed bead necklaces as well as bold tribal-inspired cuffs simply by changing the thread and bead sizes. If you’re new to beadweaving, a frame loom is a great investment that will grow with your skills. Let your creativity shine!
Heddle looms
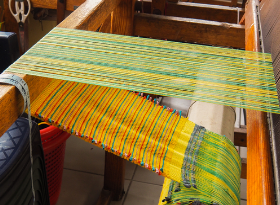
A heddle loom is another common style of bead loom used for weaving intricate beaded fabrics and tapestries. It consists of a wooden frame with warp threads held in place by a movable heddle. The heddle looks similar to a comb and can be raised and lowered to create a shed – the opening between upper and lower warp threads where beads are stitched through. This allows for weaving more complex patterns compared to simple frame looms.

I find heddle looms ideal for projects like woven bracelets or multi-layered necklaces. They give me the ability to create beautiful geometric and pixelated designs by controlling which warps beads are secured around. It’s almost like painting with beads! The heddle makes it easy to keep the warp threads organized and properly spaced too. Many different heddle setups exist, from basic rigid heddles to more intricate counterbalance looms with multiple heddles and pedals. Once you understand how to operate the heddle, you’ll see so many creative possibilities open up. It’s a magical feeling!
Off-Loom Beadweaving
Off-loom beadweaving refers to techniques for stitching beads together without a physical bead loom. Instead, the beads themselves and thread form the “loom” to build intricate jewelry and accessories. Some common off-loom techniques include brick stitch, triangular stitch, and bead embroidery.
I find off-loom weaving perfect for making beaded bangles, amulet bags, and other circular or free-form shapes that don’t require a rigid loom. It’s also wonderfully portable – I’ll often bead on the go using just beads, thread, and a needle. Following beadweaving charts is a must for keeping complex off-loom patterns on track. I see many beautiful examples from indigenous cultures like Huichol and Native American beadwork made entirely off-loom.
While learning without the guidance of a loom can be challenging at first, off-loom beadweaving allows unlimited creativity! The beads can go anywhere your hands can stitch. I encourage new beaders to start with an easy pattern like the peyote or ladder stitch. Soon you’ll be designing one-of-a-kind pieces to treasure. The only limits are your imagination!
History of (Bead) Looms
The origins of bead looms and beadweaving trace back thousands of years to ancient cultures all over the world. Some of the earliest bead looms have been found in ancient Egyptian tombs dating around 4000-3000 BCE. These early looms were simple wood frames for stringing and patterning beads. Many indigenous cultures like Native Americans, Maori tribes, and Borneo islanders all developed their own unique bead looming techniques to create amulets, jewelry, and decorations.
Looms saw a resurgence during the Victorian era in the 1800s for creating elaborate beaded bags and household decorative accessories. Then in the 1900s and onward, beadweaving was mostly a hobby and craft, but modern bead artists really elevated it into an artform all its own. New materials like nylon cord and plastic pegboards made bead looms more available than ever.
Now in the internet age, a passion for beadweaving is bringing the community together like never before to preserve knowledge and inspire new generations.
When I work with my bead loom, I feel a connection to all those crafters before me who found solace in stitching each bead by hand. I’m excited to see how bead looms continue evolving in the future!
How to Use a Bead Loom
Materials and Tools
- Reading Patterns
- Bead Loom
- Seed Beads
- Beading Needle
- Thread
- Scissors
Setting Up and Warping a Beading Loom
Setting up a bead loom may seem daunting at first, but it just takes a little practice! I like to start with a frame loom, as they are the simplest design. Make sure your working surface is flat, stable, and well-lit. Then secure the loom frame so it cannot shift around.
For warping, I prefer using nylon beading thread or cable wire. Measure out enough threads for your planned project, allowing 8-10 inches extra on each end.
Tie one end of the threads to one side of the loom. Then wrap the threads across the frame, keeping even tension and space between each. For peg looms, wind the threads around the pegs. Once all threads are in place, tie the other end off to secure. Snip any extra length. The warp threads should be taut but not too tight.
Now you’re ready to get beading! I find the process of warping a loom therapeutic. Measuring and cutting the warp threads, then winding them across the loom feels like setting the stage for creativity. Don’t worry if they aren’t perfectly spaced at first. You’ll get better with practice. Soon warping will be a breeze, and you can dive right into bringing beaded designs to life on the loom!
Weaving
Bead looms allow for many different weaving techniques, but the basic process is straightforward once you get the hang of it.
First, follow your pattern to determine which beads go where.
Then thread your beading needle with the appropriate size and type of thread.
Start at one edge, stitching beads into place by passing the needle over and under the warp threads. Move across the row, one bead at a time.
When you reach the end, move back across, again passing the needle over and under to secure the next row. Continue adding rows following your design.
For looms with heddles, use the heddle to lift the warp threads and maintain the pattern. Remember to gently push beads tight against each other and the warp.
Don’t pull too tight though! Leave a little wiggle room.
Stay focused, patient, and don’t rush – this is supposed to be relaxing!
Before you know it, you’ll have beautiful bands of beaded fabric to turn into jewelry, accessories and so much more. I find the repetitive motion of beading on the loom so soothing. Let the creativity flow through your hands!
- Adding Beads
- Using Even Tension
- Ending and Adding Threads
- Weaving in Thread Tails
Finish your beadwork
Here is a 154 word explanation of how to finish beadwork on a bead loom:
Finishing your beadwoven piece can be just as important as the weaving process itself. The goal is to secure the beads so they don’t unravel or fall off when cut from the loom. I like to thread the needle back through the work, stitching through beads in the opposite direction to lock everything together. Go through at least 2-3 inches for a sturdy bind off. Try not to stitch through the warps so they can be easily removed later.
Once secured, trim excess warps as close to the beadwork as possible. For extra stability, apply clear nail polish or a fray preventer like Fray Check to the warps. Let fully dry before cutting the remaining warps to release your piece from the loom. Add findings like clasps, cord ends or wire wrapping to finish into jewelry. Now you can proudly wear your creation! Proper finishing is crucial for longevity and professional look. Take your time to do it right and admire how far your beadweaving skills have come.
- Remove from loom
- Finishing Options


Recent Comments